
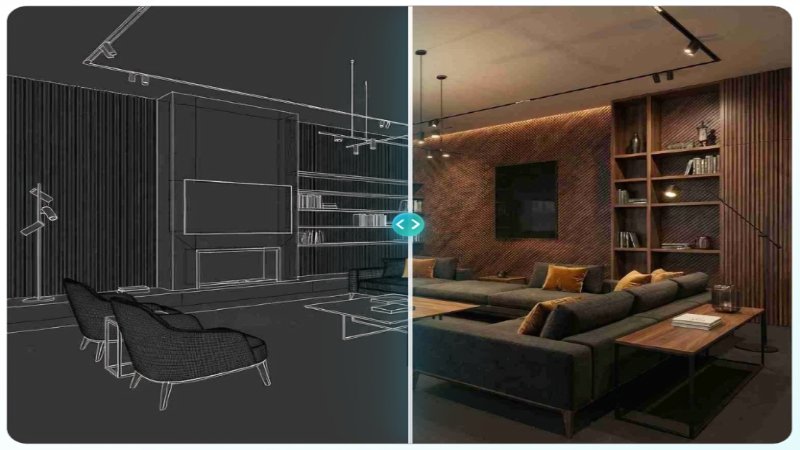
You might find that your digital room designs look a bit blurry or flat. Most people use a tool to ai design my room to save time and money. These tools are great for planning where a couch or a table should go. However, the final picture often lacks the crisp look of a real photograph.
You can fix this by using an image enhancer to sharpen the edges and improve the details.
This combination gives you a professional result without the high cost of a professional interior designer.
When you generate a room layout, the software focuses on the placement of objects. It thinks about where the window is and how the rug fits on the floor. It does not always prioritize the quality of the pixels. This can lead to images that look like a video game from ten years ago. By adding a second step to your workflow, you turn a simple sketch into a realistic vision. You can see the texture of the wood and the softness of the pillows. This makes it much easier to decide if you actually like the design before you buy any furniture.
Using these two tools together is a smart move for anyone doing a home renovation. You do not need to be a tech expert to get great results. Most of these tools work with just a few clicks. You upload your design, wait a few seconds, and download a much better version. This process saves you from the frustration of squinting at a fuzzy screen. It also helps you share your ideas with contractors or family members more clearly.
Top 1: Texture Refinement and Surface Detail
Overview
Texture refinement is the process of making surfaces look real instead of plastic. When you use an AI tool to create a room, the surfaces often look smooth and unnatural. A wooden floor might look like a brown rectangle rather than actual planks of wood. An image enhancer looks at those areas and adds the fine details back in. It identifies where the grain of the wood should be and makes it visible. This change is small, but it makes a huge difference in how you perceive the room.
Key Features
The main feature here is the ability to sharpen micro-details. This includes things like the weave of a fabric sofa or the grout lines between kitchen tiles. The tool looks for patterns and enhances them so they stand out. It also helps with the way light hits these surfaces. Instead of a flat glare, you get a realistic reflection that follows the texture of the material.
Pros and Cons
The biggest pro is the level of realism you achieve. You can almost feel the materials just by looking at the screen. It helps you catch mistakes in your design, like a rug that looks too rough or a table that is too shiny. The main con is that if you overdo it, the image can look a bit harsh. You have to find the right balance so the textures look natural and not forced.
Best For
This is best for users who are very picky about materials. If you are trying to choose between a velvet chair and a leather one, you need to see those textures clearly. It is also great for kitchen and bathroom designs where tile and stone details are very important.
Top 2: Realistic Lighting and Shadow Depth
Overview
Lighting is what gives a room its mood and shape. AI design tools sometimes struggle to place shadows correctly. They might make a room look evenly lit, which actually makes it look fake. Real rooms have dark corners and bright spots where the sun hits the floor. An image enhancer helps by deepening the shadows and brightening the highlights. This creates a sense of three-dimensional space that a flat render just cannot provide.
Key Features
This process involves adjusting the contrast and the dynamic range of the photo. The tool identifies the light sources in your AI design and emphasizes their effect. It makes the shadows under the furniture look more solid. It also makes the glow from lamps look softer and more realistic. This feature helps the eye understand the depth of the room.
Pros and Cons
A major pro is that the room feels much more inviting and warm. It looks like a place where someone actually lives. It also helps you see if a room might be too dark in real life. A con is that it can sometimes hide details in the shadows if the contrast is set too high. You might lose sight of a small decorative item in a dark corner.
Best For
This is best for people who want to understand the atmosphere of their new room. If you are planning a cozy bedroom or a bright sunroom, you need to see how the light works. It is also helpful for presenting your ideas to others because it looks more like a real photograph.
Top 3: Removal of AI Artifacts and Noise
Overview
AI generation is not perfect and often leaves behind strange marks called artifacts. These might look like blurry spots, weird lines, or a grainy texture that covers the whole image. This noise makes the design look messy and unprofessional. An image enhancer acts like a cleaning tool. It identifies these digital errors and smooths them out. It replaces the grain with clean, solid colors and sharpens the edges that the AI might have smudged.
Key Features
The core feature is noise reduction. The software analyzes the pixels to see which ones belong to the design and which ones are just digital junk. It also uses edge detection to make sure that the lines of your walls and furniture stay straight. This prevents the melting look that sometimes happens with AI-generated images.
Pros and Cons
The main pro is a much cleaner and more polished look. Your designs will look like they came from a high-end software package. It removes the distractions that might keep you from focusing on the layout. A con is that very heavy noise reduction can sometimes make an image look a bit too smooth, almost like a painting.
Best For
This is best for designs with many complex patterns or dark areas. These are the places where AI noise usually shows up the most. It is also essential if you plan to post your designs on social media or on a blog where people will look closely at them.
Top 4: High Resolution Upscaling for Large Displays
Overview
Most free design tools give you a small file that looks okay on a phone but bad on a computer. If you try to make the image bigger, it becomes pixelated and blocky. An image enhancer uses upscaling technology to grow the image without losing quality. It does not just stretch the pixels. It actually creates new pixels to fill in the gaps. This allows you to take a small thumbnail and turn it into a large, clear picture.
Key Features
The primary feature is intelligent upscaling. This often allows you to double or quadruple the size of your image. The tool maintains the sharpness of the original design while adding the necessary data to make it bigger. This keeps the lines of your furniture looking crisp, even when you zoom in.
Pros and Cons
The biggest pro is the ability to see your design on a big screen. You can put it on your TV to get a real sense of the scale of the room. It also makes the image good enough for printing. The con is that upscaling can take a bit more processing time than other features. Large files also take up more space on your hard drive.
Best For
This is best for anyone who needs to present their designs to a group. If you are showing your ideas to a partner or a client, you want a big, clear image. It is also great for creating a physical mood board where you need to print out your ideas.
Top 5: Color Vibrancy and Visual Consistency
Overview
Sometimes an AI design can look a bit grey or washed out. The colors do not always pop the way they would in real life. An image enhancer can fix the color balance to make the room look more vibrant. It ensures that the blue of your curtains matches the blue of your pillows. It also helps with the overall consistency of the image. It makes sure that the whole room looks like it belongs together in the same photo.
Key Features
This involves color correction and saturation adjustments. The tool can automatically detect if an image is too yellow or too blue and fix it. It also boosts the colors that are already there to make them look more appealing. This helps the viewer feel the intended mood of the design.
Pros and Cons
A pro is that the design looks much more exciting and attractive. It helps you see the true potential of your color palette. A con is that it can be easy to make the colors look too bright. If the saturation is too high, the room might look like a cartoon instead of a real home.
Best For
This is best for users who are focusing on a specific color scheme. If you are trying to match paint colors or fabric swatches, you need the colors on your screen to be as accurate as possible. It is also good for creating a specific mood, like a bright and airy kitchen.
Comparison Summary
| Reason | Primary Benefit | User Impact |
| Texture Refinement | Realistic surfaces | Better material choices |
| Lighting Correction | Added depth | Realistic atmosphere |
| Artifact Removal | Cleaner images | Professional appearance |
| Resolution Upscaling | Larger files | Better for presentations |
| Color Vibrancy | Accurate tones | Better color matching |
Final Recommendation
If you want the best results for your home project, you should use both types of tools. Start by using a tool to ai design my room so you can get the layout and furniture placement exactly right. Once you have a design you like, do not stop there. Take that image and put it through an image enhancer, free to fix the blur and the lighting.
This two-step process ensures that your vision is clear and easy to understand. You will not have to guess what a texture looks like or worry about a grainy image. By taking an extra minute to enhance your design, you create a much more useful tool for your renovation. It helps you avoid expensive mistakes and gives you the confidence to move forward with your plans. Whether you are a hobbyist or a serious renovator, this combination is the most effective way to visualize your future home.